Physical Address
304 North Cardinal St.
Dorchester Center, MA 02124
Physical Address
304 North Cardinal St.
Dorchester Center, MA 02124


Complete DIY plans and expert tips to build a decorative tree bookcase for any room, style, and budget.
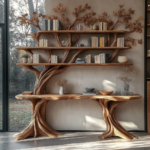
The decorative tree bookcase is a striking and functional piece that brings nature-inspired design into your home. Whether you need a small tree bookshelf for a child’s room, a tall tree bookshelf for the living room, or a narrow tree bookshelf to fit a tight hallway, these DIY plans will guide you. This long-form guide covers materials, tools, budget breakdowns, precise cut lists for common sizes, step-by-step assembly, finishing, safety, and styling tips for a tree bookshelf for bedroom or living spaces.

Below are three common builds to fit different budgets and spaces. All dimensions are a starting point; adapt as needed.
Choose materials based on budget and finish expectations. For a classic look build a wooden tree bookshelf with solid pine or birch; for modern minimalism, use plywood with veneer.
Base the cut list on 3/4″ plywood. Adjust quantities for taller builds.

For a tall tree bookshelf, scale lengths to match height and add more shelf pieces spaced 10–14″ apart depending on book sizes.
Sketch the tree silhouette on paper. Decide shelf locations; branches act as shelf supports. Mark full-size templates on cardboard to test proportions against a wall and furniture.
Trace the tree profile onto your plywood sides. Use a jigsaw to cut the curved trunk and branch spaces. Cut shelves to width allowing for a snug fit where branches will support them. Label every piece.

Notch the trunk pieces where the shelves will sit or create internal cleats glued and screwed to the inside of the trunk. For a modern tree bookshelf, make thin cantilevered shelves that tuck into slots.
Dry fit shelves into notches and clamp. Check for level and consistent spacing. Glue and screw through the trunk into shelf ends for hidden strength. If you used a back panel, attach it now to square the unit.
Sand all surfaces progressively from 80 to 220 grit. Fill screw holes with wood filler. Apply edge banding if using plywood for a clean look. For a wooden tree bookshelf, take time to smooth curves — this elevates the final appearance.
Apply stain or primer and paint depending on your finish choice. For bedroom installations, consider softer paint colors or whitewashed wood to complement bedding. Secure the bookcase to wall studs using brackets or anti-tip straps — safety first for tall tree bookshelves.
A decorative tree bookcase makes a statement whether painted bright for a child’s playroom or stained natural for a modern tree bookshelf in the living area. For a tree bookshelf for bedroom, keep shelf edges soft and use warmer finishes. Add integrated LED strips under branches to highlight decorative objects.
Dust regularly, avoid overloading shelves beyond the recommended weight, and touch up finish as needed. For wooden tree bookshelf builds, regular waxing or oiling of exposed wood maintains beauty over years.
With careful planning and the right approach, your decorative tree bookcase will be a durable, beautiful addition to any room. Start with a small model to build confidence, then scale to a tall or narrow tree bookshelf when you’re ready. Happy building!